نصب وردپرس روی لوکال هاست
آموزش نصب وردپرس روی ابونتو
قدم اول: بهروزرسانی پکیجهای سیستمعامل
با دستور زیر، پکیجهای نرمافزار سرور را بهروزرسانی میکنیم تا سیستم بهطور خودکار آماده مراحل بعدی شود:
sudo apt-get update && sudo apt-get upgrade -y
قدم دوم: نصب وبسرور آپاچی در اوبونتو
اکنون میخواهیم سرور آپاچی را روی اوبونتو نصب کنیم. برای این کار از دستور زیر استفاده میکنیم:
sudo apt install apache2 apache2-utils
پس از نصب آپاچی نیاز است نسبت به فعال کردن وبسرور اقدام کنید. برای اجرا و استارت آپاچی دستور زیر را تایپ کنید:
sudo systemctl enable apache2
sudo systemctl start apache2
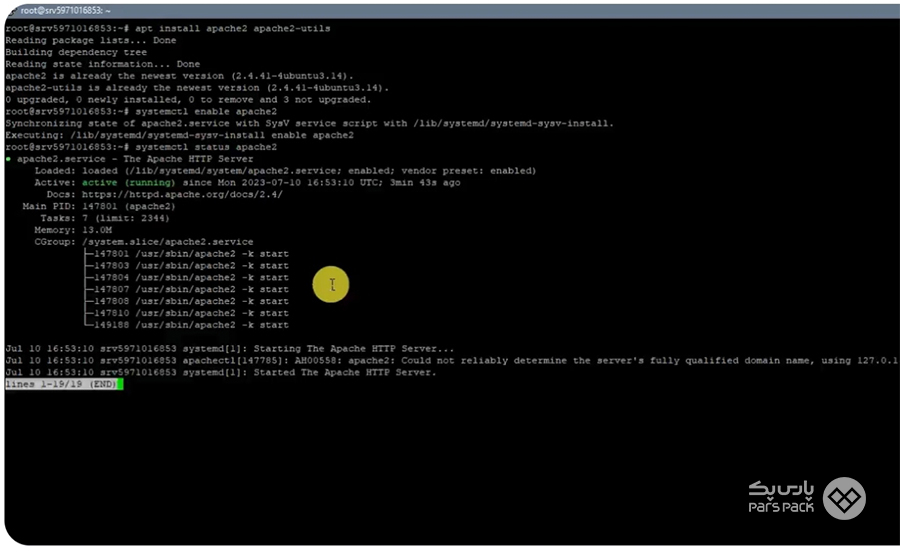
برای تست عملکرد آپاچی در مراحل نصب وردپرس در اوبونتو، میتوانید از دستور systemctl status apache استفاده کنید. اگر وبسرور اکتیو باشد، پیغام زیر برایتان به نمایش درمیآید:
همچنین میتوانید آدرس آیپی سرور را در مرورگر تایپ کنید. درصورتیکه در حال نصب وبسرور آپاچی روی لوکال هاست هستید، از یکی از دو آدرس زیر میتوانید استفاده کنید:
- http://127.0.0.1
- http://localhost
در مسیر نصب وردپرس در اوبونتو به ماژول mod_rewrite آپاچی نیاز داریم تا مشکلی در عملکرد وردپرس بهوجود نیاد. این ماژول را با دستور زیر اجرا کرده و سپس وبسرور را ریاستارت میکنیم:
sudo a2enmod rewrite
sudo systemctl restart apache2
قدم سوم: نصب دیتابیس MySQL در سرور اوبونتو
در نصب وردپرس روی سرور لینوکس نیاز است دیتابیس MySQL را نیز اجرا کنیم. برای این کار دستور زیر را در ترمینال وارد میکنیم:
sudo apt install mysql-client mysql-server
سپس با دستور زیر، MySQL را اجرا خواهیم کرد:
sudo mysql_secure_installation
در این قسمت از نصب وردپرس روی سرور لینوکس، سیستم پیشنهاد نصب یک افزونه برای ممنوع کردن رمز عبورهای ضعیف را میدهد. سپس با تغییر رمز عبور، دسترسی یوزر superuser را از شبکه و guest را محدود میکنیم. این مرحله از آموزش نصب وردپرس در اوبونتو را با فشار دادن دکمه Y بهعنوان تایید به پایان برسانید.
برای آشنایی با ویژگیها، کاربردها و راهنمای خرید سرور مجازی لینوکس مقاله زیر را از دست ندهید.
قدم چهارم: نصب PHP روی سرور اوبونتو
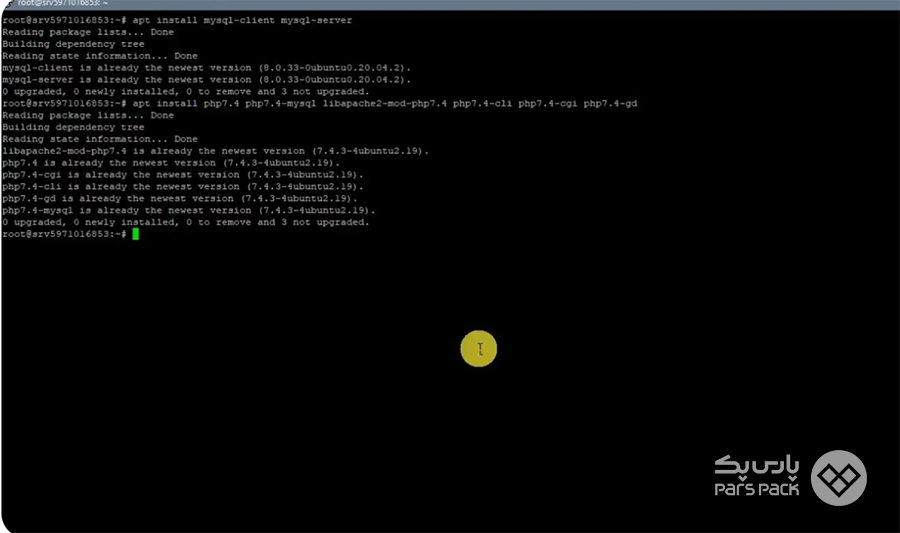
قبل از نصب وردپرس در اوبونتو نیاز است PHP را روی این سرور نصب کنیم. برای این کار، خط زیر را در ترمینال وارد خواهیم کرد. در آموزش نصب وردپرس در اوبونتو ما از نسخه php 7.4 استفاده کردیم:
sudo apt install php7.4 php7.4-mysql libapache2-mod-php7.4 php7.4-cli php7.4-cgi php7.4-gd
قدم پنجم: تست نحوه عملکرد PHP
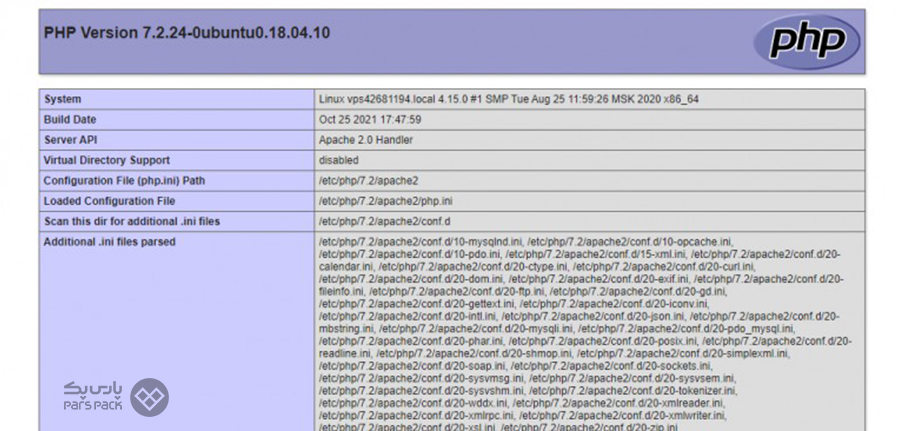
اکنون قصد داریم نحوه عملکرد PHP را با تابعی info.php بسنجیم. برای این کار فایلی به نام test.php را در مسیر دایرکتوری var/www/html قرار میدهیم.
sudo nano /var/www/html/test.php
برای آزمایش، دستور زیر را در ویرایشگر ذخیره کرده و از آن خارج شوید:
<?php
phpinfo();
?>
سپس آدرس زیر را در مرورگرتان وارد کنید:
http://ip-address/test.php
بهجای ip-address آیپی سرور خودتان را قرار دهید. درصورتیکه روال را بهدرستی طی کرده باشید، صفحه اطلاعات PHP را خواهید دید.
قدم ششم: دانلود و نصب وردپرس بر روی اوبونتو ۲۲.۰۴
نوبت به اصل ماجرا در نصب وردپرس در اوبونتو رسیدیم. تمام روال زیر طی شد تا بستر را برای نصب وردپرس روی اوبونتو فراهم کنیم. اکنون نسخه جدید وردپرس را از سایت رسمی wordpress.com دانلود کنید. برای این کار دستور زیر را بنویسید:
wget -c http://wordpress.org/latest.tar.gz
سپس با دستور زیر، محتویات آن را در پوشه خود Extract کنید:
tar -xzvf latest.tar.gz
درنهایت، نیاز است فایلهای وردپرس را از پوشه فعلی در داکیومنت روت کپی کنیم. بهطور پیشفرض در اوبونتو دایرکتوری روت، مسیر /var/www/html/ است.
sudo rsync -av wordpress/* /var/www/html/
اکنون باید دسترسیهای لازم را برای خواندن این فایلها به وبسرور بدهیم. این کار را با تایپ دستور زیر انجام خواهیم داد:
sudo chown -R www-data:www-data /var/www/html/
sudo chmod -R 755 /var/www/html/
برای فعال ماندن وردپرس بهطور پیشفرض، نیاز است فایل index.html را حذف کنیم:
sudo rm /var/www/html/index.html
تا به این مرحله از آموزش نصب و راه اندازی وردپرس، موفق شدیم آن را روی اوبونتو نصب کنیم. بااینحال، هنوز یکسری اقدامات مانند ایجاد دیتابیس باقی مانده است.
آیا میخواهید Node.js را در عرض چند دقیقه روی سرور اوبونتو نصب و شروع به توسعه برنامههای Node.js خود کنید، برای این کار مقاله زیر را بخوانید.
قدم هفتم: ساخت دیتابیس و اتصال آن به اوبونتو
برای ساخت دیتابیس نیاز است وارد رابط مدیریت MYSQL شویم:
sudo mysql -u root -p
حالا رمز عبوری که حین نصب ایجاد کردیم، وارد و دستورات زیر تایپ میکنیم تا دیتابیس و یوزر ایجاد شود:
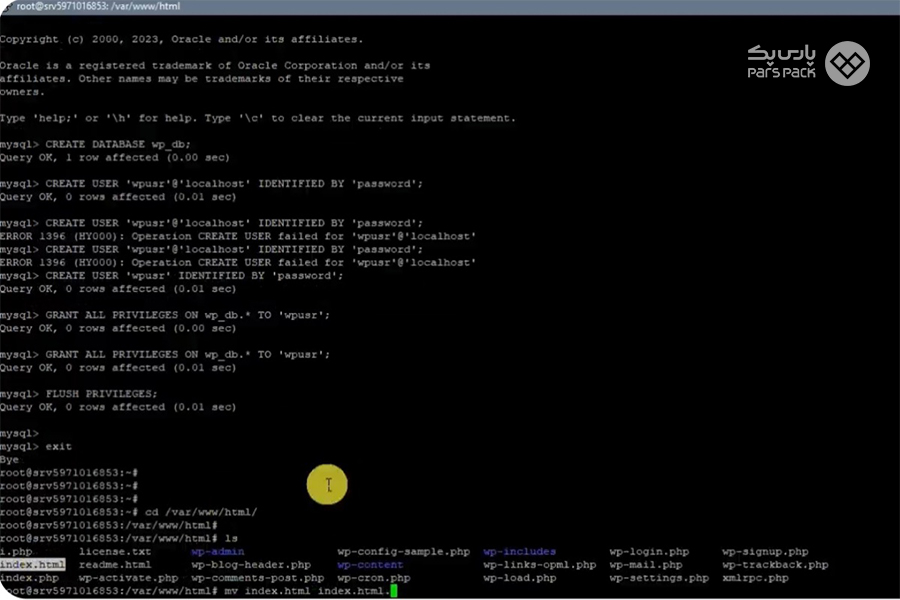
mysql> CREATE DATABASE wp_db;
mysql> CREATE USER ‘wpusr’@’localhost’ IDENTIFIED BY ‘password’;
mysql> GRANT ALL PRIVILEGES ON wp_db.* TO ‘wpusr’@’localhost’;
mysql> FLUSH PRIVILEGES;
mysql> EXIT;
همانطور که میبینید، دیتابیسی با نام wp_db و کاربری با wpusr در لوکال هاست سرور ایجاد کردیم و برای اجرای تغییرات دستور FLUSH را بهکار بردیم. درنهایت، با دستور EXIT از محیط MYSQL خارج شدیم.
قدم هشتم: پیکربندی وردپرس در سرور اوبونتو
در هشتمین مرحله از آموزش نصب وردپرس در اوبونتو، نیاز است صفحه پیشفرض آپاچی را با صفحه وردپرس جایگزین کنیم. برای این کار، یک ls میگیریم:
cd /tmp
curl -O https://wordpress.org/latest.tar.gz
با وارد کردن این دستور فایلی به نام index.html ظاهر خواهد شد. نیاز است نام فایل index.html را به index.html.old تغییر دهیم:
mv /tmp/wordpress/wp-config-sample.php /tmp/wordpress/wp-config.php
اکنون با وارد کردن آدرس آیپی سرور اوبونتو در مرورگر، به جای صفحه پیشفرض PHP، صفحه وردپرس بالا میآید. پنجرهای برای انتخاب و تایید زبان باز میشود.
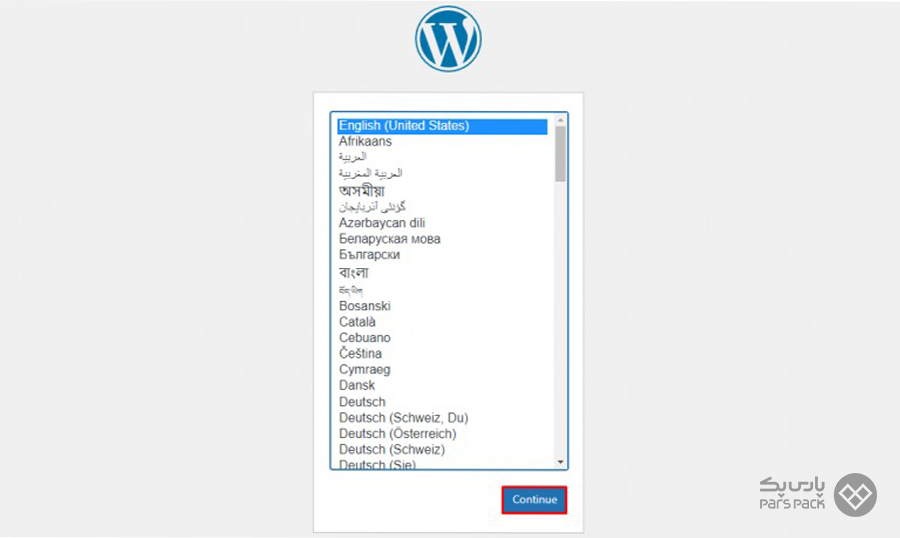
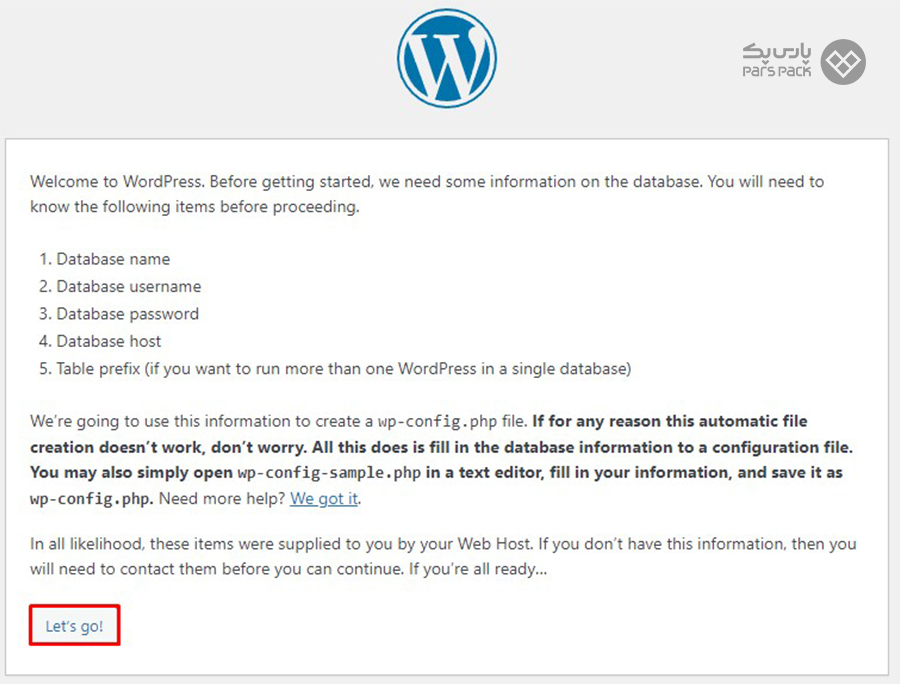
روی Continue کلیک کرده و سپس آیکون Let’s go را فشار دهید.
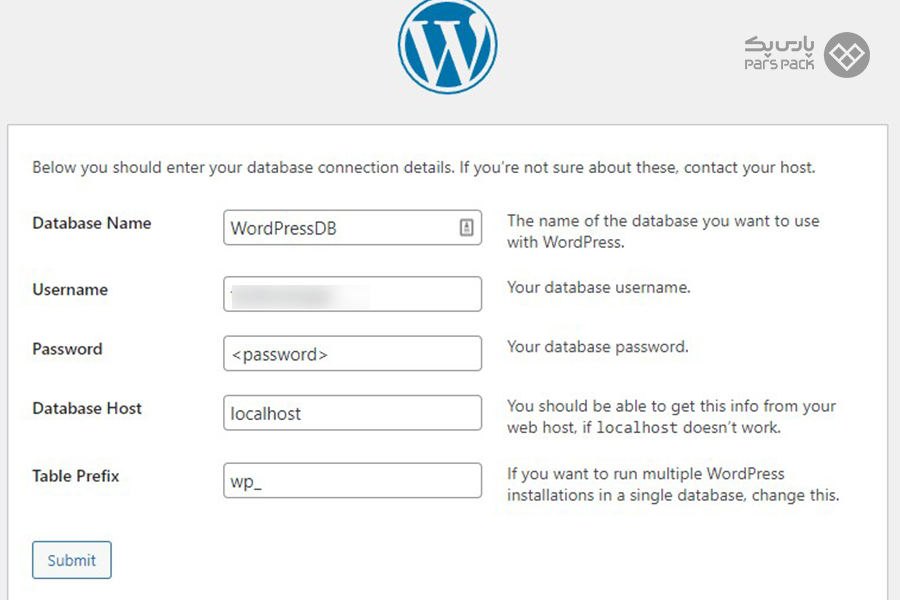
پس از وارد کردن نام وبسایت، نامکاربری، رمزعبور و وارد کردن localhost در بخش Database host میتوانید وارد سیستم مدیریت محتوای وردپرسی خود شوید.
اکنون نوبت آن رسیده یک قالب جذاب بههمراه محتوای لازم را روی سایتتان بارگذاری کنید.
قالب مدنظرتان را بارگذاری کنید
source:
- https://parspack.com/blog/os/linux/ubuntu/install-wordpress-on-ubuntu-server
- https://parspack.com/blog/cms/wordpress/install-wordpress
****
****
WordPress is one of the most common content management systems (CMS) in use today. WordPress allows Ubuntu and other Linux users to design a website and add content using its intuitive GUI. WordPress also allows site owners to install a diverse selection of themes and plug-ins to further customize their site. This guide explains how to install WordPress on Ubuntu 22.04 LTS. It also describes how to configure and start using WordPress after installation.
What is WordPress?
WordPress is a long-time foundation for personal websites and blogs. It is available for free and considered easy to install, configure, and use. It allows site owners to design an attractive site and add information without knowing anything about HTML or CSS. It also features additional modules for further customization along with a large, knowledgeable, and passionate user base. WordPress is available for all major operating systems, although it is most commonly used with Linux.
WordPress can be downloaded to an Ubuntu server using wget. It only requires minor pre-installation configuration changes to other applications. However WordPress relies on several other applications to function. It uses the PHP programming language, so PHP must already be installed. In addition, WordPress requires a web server and a relational database management system (RDBMS).
WordPress Prerequisites
A Ubuntu LAMP or LEMP stack satisfies all these prerequisites. A LAMP stack includes the Linux operating system, the Apache web server, the MySQL RDBMS, and the PHP programming language. A LEMP stack substitutes NGINX (pronounced “engine-x”) in place of Apache and sometimes uses the MariaDB database instead of MySQL. Either stack can be installed using the standard Ubuntu library. For information on installing a LAMP stack on Ubuntu 22.04, see the Linode guide. There is also a Linode guide to installing a LEMP stack on Ubuntu 22.04.
For greater security, WordPress highly recommends HTTPS. However, these instructions work whether HTTPS is configured on the server or not. For information about enabling HTTPS on Ubuntu, see the Linode guide on enabling HTTPS on Apache. An alternate guide for NGINX is also available.Note
WordPress sites are almost always accessed using a domain name. For more information on domains and how to create a DNS record, see the Linode DNS Manager guide.
Before You Begin
- If you have not already done so, create a Linode account and Compute Instance. See our Getting Started with Linode and Creating a Compute Instance guides.
- Follow our Setting Up and Securing a Compute Instance guide to update your system. You may also wish to set the timezone, configure your hostname, create a limited user account, and harden SSH access.
- Fully configure a LAMP or LEMP stack on the Linode and confirm it is working properly.
Note
This guide is written for a non-root user. Commands that require elevated privileges are prefixed with sudo. If you are not familiar with the sudo command, see the Users and Groups guide.
How to Prepare the LAMP or LEMP Stack for WordPress
To properly configure and use WordPress on Ubuntu, a LAMP or LEMP stack must already be installed and working. However, WordPress requires a few additional modifications to the various LAMP/LEMP Stack components. In the following examples, replace example.com with the actual domain name wherever it appears.Note
These instructions are designed for Ubuntu 22.04 LTS, but are generally valid for all recent Ubuntu releases.
How to Configure Apache for WordPress
If you are using a LAMP stack, enable an additional Apache module and restart the server. Follow these steps to configure Apache to support WordPress.
- Enable the rewrite module. This allows for more readable links within the site.
sudo a2enmod rewriteEnabling module rewrite. - (Optional) To allow WordPress plug-ins and extensions to use
.htaccessfiles, set theAllowOverridedirective to enable them. Add the following configuration to theVirtualHostblock within the site configuration file. This file is normally located at/etc/apache2/sites-available/example.com.conf. For theDirectoryname, use the actual domain name instead ofexample.com.NoteIf you are not using a site configuration file, skip this step.File: /etc/apache2/sites-available/example.com.conf<VirtualHost *:80> ... <Directory /var/www/html/your_domain/public_html/> AllowOverride All </Directory> ... </VirtualHost> - Run the Apache
configtestutility to test the changes. It might display some warnings, but ifSyntax OKappears in the output, the syntax is valid.sudo apache2ctl configtestSyntax OK - Restart Apache.
sudo systemctl restart apache2
How to Configure NGINX for WordPress
If you are using a LEMP stack, make the following configuration changes.
- Edit the site configuration file at
/etc/nginx/sites-available/example.com. Make the following change to thelocation /block. Addindex.phpto the start of theindexfield. This tells NGINX to search for this file first.File: /etc/nginx/sites-available/example.com.conf... location / { index index.php index.html index.htm; try_files $uri $uri/ =404; } ... - Use
unlinkto disable the default NGINX configuration file.sudo unlink /etc/nginx/sites-enabled/default - Restart NGINX to reload the configuration.
sudo systemctl restart nginx
How to Configure MySQL for WordPress
WordPress uses a separate SQL database to store the site’s contents and configuration. Use the following commands to create a database and a database user. These steps apply to both MySQL and MariaDB.
- Log in to MySQL as
root.sudo mysql -u rootNoteIf you followed all the instructions in our prerequisite guide for LAMP, usesudo mysql -u root -pinstead, and enter your password when prompted. - Create a database named
wordpress.CREATE DATABASE wordpress; - Create a new user for the
wordpressdatabase and grant the user all rights. Flush all privileges at the end. In the following commands, replacewpuserwith a unique user name andpasswordwith a more secure password.CREATE USER 'wpuser'@'localhost' IDENTIFIED BY 'password'; GRANT ALL PRIVILEGES ON wordpress.* TO 'wpuser'@'localhost'; FLUSH PRIVILEGES; - Exit the database.
exit
How to Configure PHP for WordPress
Although WordPress can be installed using the default PHP packages, many plug-ins and themes require additional modules. Follow these instructions to upgrade PHP.
- For greater flexibility, install the following PHP components.
sudo apt install php-curl php-gd php-mbstring php-xml php-xmlrpc php-soap - Reload Apache or NGINX to apply the changes.
sudo systemctl restart apache2sudo systemctl restart nginx
Downloading WordPress for Ubuntu 22.04
The Ubuntu LAMP or LEMP stack is now fully configured and ready for WordPress. Follow these steps to download and install WordPress.
- Create a new
srcdirectory inside the root directory for the website. The root directory is normally located atvar/www/html/. Replaceexample.comwith the name of the domain.sudo mkdir -p /var/www/html/example.com/src - Enter the new directory.
cd /var/www/html/example.com/src - Download the WordPress package using
wget.sudo wget http://wordpress.org/latest.tar.gz - Extract the WordPress files from the
tarfile.sudo tar -xvf latest.tar.gz - (Optional) Rename the archive using the current date. This makes it easier to restore the files in the future.
sudo mv latest.tar.gz wordpress-`date "+%Y-%m-%d"`.tar.gz - Move the extracted files to the root directory for the domain. In a typical configuration, this is the
public_htmldirectory.sudo mv wordpress/* ../public_html/ - Ensure the webserver user is given ownership over the entire root directory for the domain.
sudo chown -R www-data:www-data /var/www/html/example.com
Configuring WordPress on Ubuntu 22.04
- Visit the domain using a web browser. The default language selection page first appears. Choose your language and select Continue.
http://example.com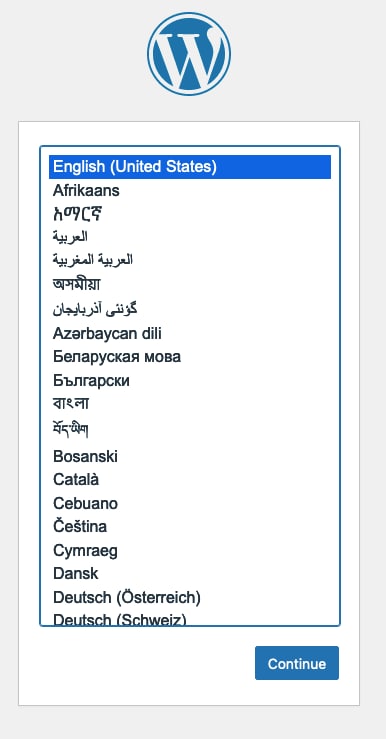
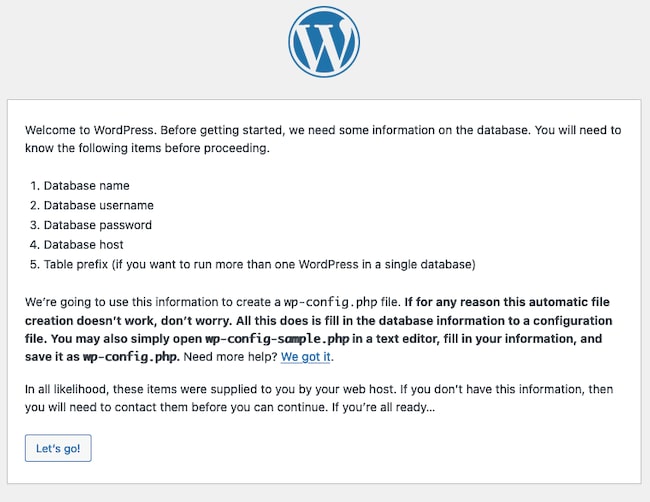
- WordPress then displays an informational page explaining the configuration process and required information. Have the database and user details readily available. Click the Let’s Go button to continue.
- On the next form, enter the name, user name, password, and host for the database. Use
localhostfor theDatabase Hostfield. If this is the first WordPress installation on the Ubuntu server, leave theTable Prefixfield set towp_. Click the Submit button after entering all the information.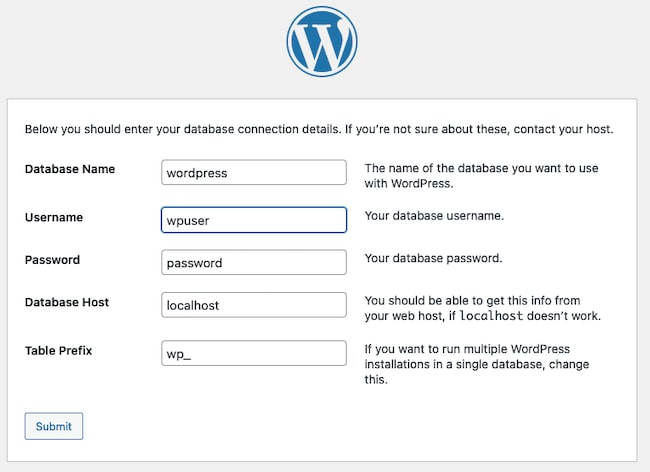
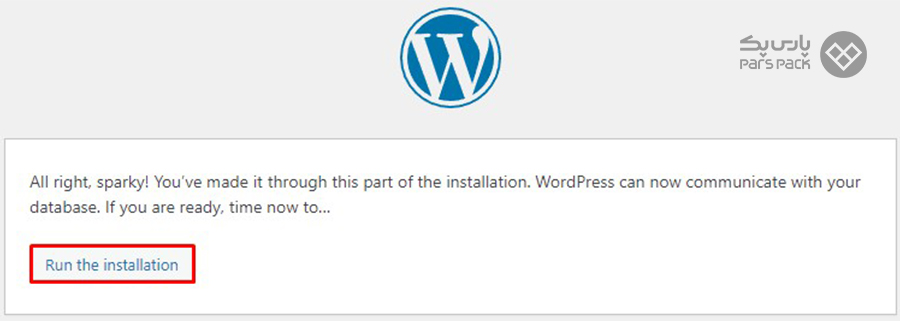
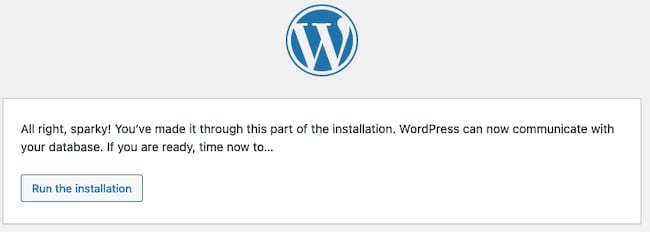
- If the information is correct, WordPress confirms the database connection is successful. If there is a connection error, WordPress prompts you to correct the errors. Most failures are due to an incorrect user name or password. Click the Run the installation button to continue.
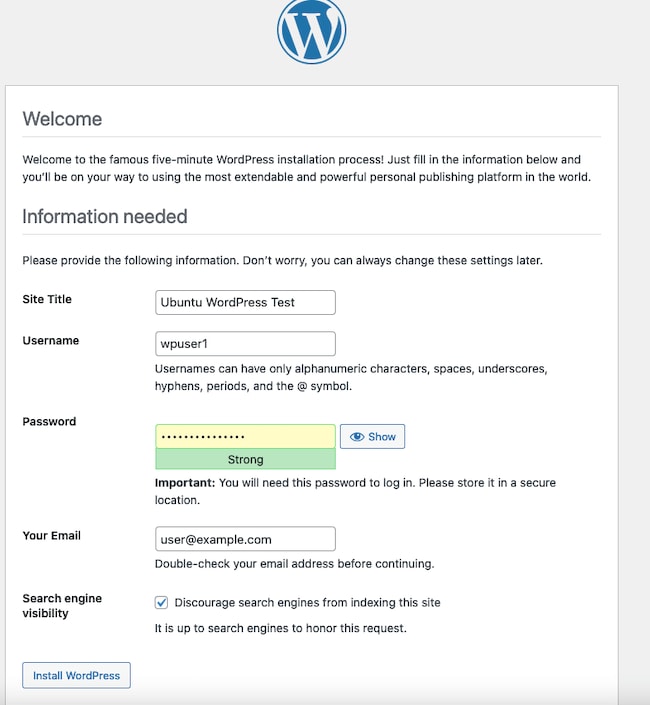
- The next form prompts for a username, password, and email for the site administrator. It also prompts for a site name and asks whether search engines should index the site. Enter all information and then select Install WordPress to continue.
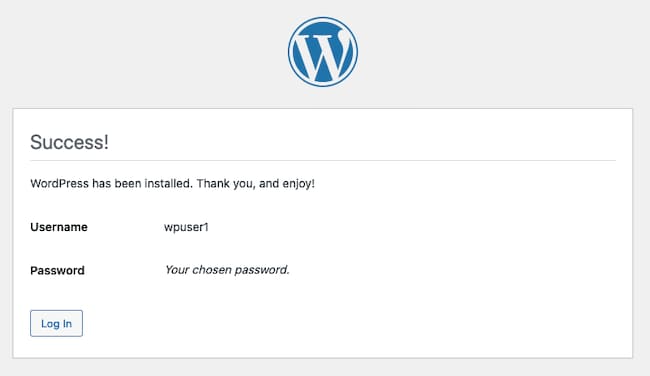
- WordPress confirms the account has been successfully created. Click the Log In button to continue to the login screen.
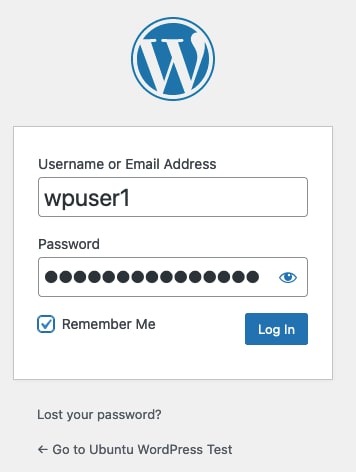
- At the login page, enter the user name and password for the WordPress account and click Log In.
8.The browser displays the WordPress dashboard. Use the dashboard to configure and administer the site, or to add new content. Bookmark the dashboard for future reference. You can also visit it by appending /wp-admin to the domain name, for example http://www.example.com/wp-admin/.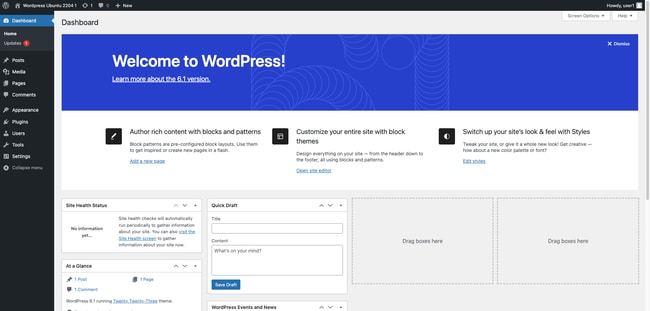
(Optional) WordPress typically uses FTP credentials to install new themes and plug-ins. Add the following lines to the wp_config.php file to remove this restriction. This file is located in the root directory for the domain inside the public_html subdirectory.File: /var/www/html/example.com/public_html/wp-config.php/** Bypass FTP */ define('FS_METHOD', 'direct');
At this point, the WordPress site is ready to use. To see how the site appears to other users, enter the name of the domain in the address bar of the browser. While logged in, you can also add new content directly from this page.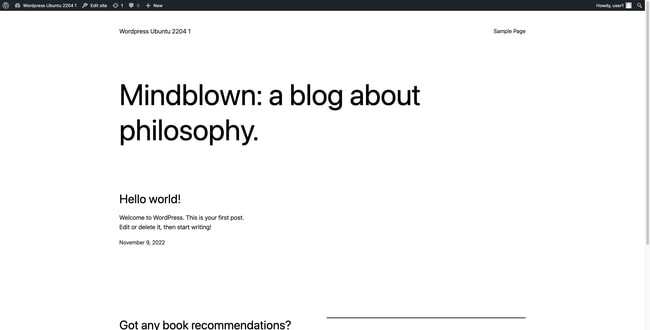
Learning More about WordPress
The WordPress Dashboard is fairly self-explanatory. From the left-menu of the Dashboard, users can access pages allowing them to change settings, select themes, and install new plug-ins. Users can select the Posts option to add new pages or modify existing content.
Before proceeding, it is worthwhile to spend more time learning about WordPress. The First Steps with WordPress guide is very useful. It walks users through the WordPress interface and explains how to perform basic tasks. In addition, How to Configure WordPress summarizes how to configure some of the more common WordPress settings.
For complete information about WordPress, including all advanced settings, see the WordPress documentation site.
A Summary about Installing WordPress on Ubuntu 22.04
WordPress is one of the most popular CMS applications for personal websites and blogs. It allows site owners to easily manage and customize their sites and quickly add new content. No knowledge of HTML, CSS, or PHP is required.
It is easy to install WordPress on Ubuntu. WordPress requires a Ubuntu LAMP or LEMP stack, including a web server, RDBMS, and the PHP programming language. Download the WordPress files using wget and unzip the archive. A few further adjustments to the LAMP/LEMP stack are also required. After installation, set up WordPress using its intuitive web interface. For more information on WordPress, see the WordPress website.
More Information
You may wish to consult the following resources for additional information on this topic. While these are provided in the hope that they will be useful, please note that we cannot vouch for the accuracy or timeliness of externally hosted materials.
- WordPress
- WordPress documentation
- First Steps with WordPress
- LAMP Stack Wikipedia page
- MySQL 8.0 Reference Manual
- MySQL Development Site
- Ubuntu Documentation
- Apache HTTP Server Documentation
- PHP Website
- PHP Documentation
- NGINX
This page was originally published on May 19, 2022.
Your Feedback Is Important
Let us know if this guide was helpful to you.
Join the conversation.
Read other comments or post your own below. Comments must be respectful, constructive, and relevant to the topic of the guide. Do not post external links or advertisements. Before posting, consider if your comment would be better addressed by contacting our Support team or asking on our Community Site.

Disqus trackers and content blocked
Your Firefox settings blocked this content from tracking you across sites or being used for ads.
Content from blocked embed